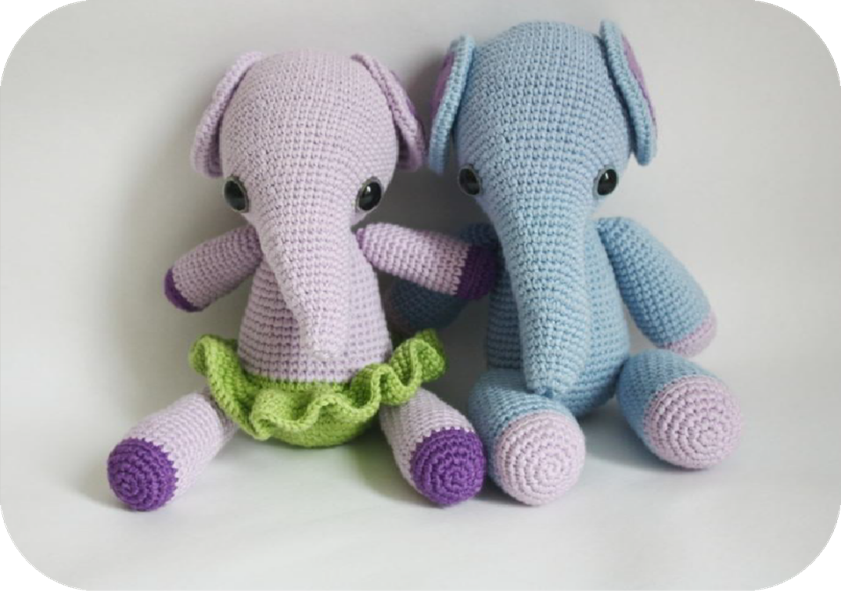
Free amigurumi crochet elephant pattern: Mio and Mia

AMIGURUMI Mio the Elephant PATTERN


This Amigurumi Elephant is crocheted in spiral rounds. Do not join rounds. Mark the 1st stitch of every round with a stitch marker.
I use yarn but you could also
use safety pins, stitch markers or bobby pins.
Size: with 2mm crochet hook:
Approx. 25 cm/9,8 inches
Tools and materials what you´ll need:
3.75mm crochet hook but I like to use a hook that’s 1-2 size smaller so I used a 2mm hook.
Cotton or some other yarn you would like (I used: Katia
Bamboo), 16mm black or any other
color safety eyes you would like, and a yarn needle.
For the filling use fiberfill and stuff gradually!
Crochet skill level:
This pattern requires knowledge of basic crochet terms: Crocheting in the round, forming a magic ring, single crochet stitch (sc), single crochet increase (Inc), single crochet invisible decrease (Invdec), slip stitch (Sl. st.), crochet in the back loops (Bl sc) and and joining
pieces together.
Abbreviations used:
“Magic ring”:
crochet over an adjustable loop with 6 sc,
then pulling on the yarn tail until there is no hole left.
“Neat finish”: one method to finish a toy piece in amigurumi. I will describe it in my pattern as well.
Sc – single crochet
Inc – increase
Invdec – invisible decrease
Bl sc– back loop
Sl. st – slip stitch
Head
Make with blue yarn
1) 6 sc into a magic ring
2) 6 x Inc (12)
3) [1 x Inc, 1 sc] all around (18))
4) [1 x Inc, 2 sc] all around (24)
5) [1 x Inc, 3 sc] all around (30)
6) [1 x Inc, 4 sc] all around (36)
7) [1 x Inc, 5 sc] all around (42)
8) [1 x Inc, 6 sc] all around (48)
9) [1 x Inc, 7 sc] all around (54)
10) [1 x Inc, 8 sc] all around (60)
11) [1 x Inc, 9 sc] all around (66)
12-18) sc all around (66)
19) [1 x Invdec, 9sc] all around (60)
20) sc all around (60)
21) 30 sc, 3 x [1 x Invdec,
8 sc], (57)
22) sc all around (57)
23) 30 sc, 3 x [1 x Invdec,
7 sc](54)
24) sc all around (54)
25) 30 sc, 3 x [1 x Invdec,
6sc] (51)
26) 3 x [1 x Invdec,
8 sc], 21 sc(48)
Start stuffing
here, continue: to stuff
gradually as you go!
27) 27 sc, 3 x [1 x Invdec,
5sc] (45)
28) 27 sc, 3 x [1 x Invdec,
4sc] (42)
29) 3 x [1 x Invdec, 7sc], 3 x [1 x Invdec,3sc] (36)
30) sc all around
(36)
If using safety eyes, place a stitch marker on 30th
row. You will place the eyes between row 30 and 31 on a row 27.
Eye placement: count from the begining of the row approx. 3 stitches, place one eye, count
approx. 20 stitches place another eye. Look also the
head shape for better placement. Photo 1.
19)
3 x [1 x Invdec, 6sc], 3 x [1 x Invdec, 2sc] (30)
32-34) sc all around (30)
35) 3 x [1 x Invdec,
5sc], 9 sc(27)
36) sc all around (27)
37) 3 x [1 x Invdec, 4sc], 3 x [1 x Inc, 2sc] (27)
38) sc all around (27)
39) 3 x [1 x Invdec, 3sc], 3 x [1 x Inc, 3sc] (27)
40) sc all around (27)
41) 3 x [1 x Invdec,
2sc], 3 x [1 x Inc, 4 sc] (27)
42) sc all around (27)
43) 3 x [1 x Invdec, 1sc], 3 x [1 x Inc, 5sc] (27)
44) sc all around (27)
45) 3 x Invdec, 21sc (24)
46) 2 x Invdec,
9 sc, 2 x Inc, 9 sc
(24)
47) 2 x Invdec,
20 sc (22)
48) sc all around (22)
49) 9 sc, 2 x Invdec,
9 sc (20)
50) 9 sc, 1 x Invdec,
9 sc (19)
51) 2 x Invdec,
5 sc, 1 x Invdec, 8
sc (16)
52-53) sc all around (16)
54) Invdec all around (8)
For a “neat finish” look at the photos: 4-10
Body:
Make with blue yarn
1) 6 sc into a magic ring
2) 6 x Inc (12)
3) [1 x Inc, 1 sc] all around (18)
4) [1 x Inc, 2 sc] all around (24)
5) [1 x Inc, 3 sc] all around (30)
6) [1 x Inc, 4 sc] all around (36)
7) [1 x Inc, 5 sc] all around (42)
8) [1 x Inc, 6 sc] all around (48)
9) [1 x Inc, 7sc] all around (54)
10-13) sc all around (54)
14) 3 x [1 x Invdec,
16 sc] (51)
15) sc all around (51)
16) 7 sc, 2 x [1 x Invdec, 15 sc],1 x Invdec, 8 sc (48)
17-18)sc all around (48)
19) 3 x [1 x Invdec,
14 sc](45)
20) sc all around (45)
21) 6 sc, 2 x [1 x Invdec,
13 sc], 1 x Invdec, 7 sc (42)
22) sc all around (42)
23) 3 x [1 x Invdec,
12 sc] (39)
24) sc all around (39)
25) 5 sc, 2 x [1 x Invdec,
11 sc], 1 x Invdec, 6sc (36)
26) sc all around (36)
27) 3 x [1 x Invdec,
10 sc] (33)
28) sc all around (33)
29) 4 sc, 2 x [1 x Invdec,
9 sc],1 x Invdec, 5
sc (30)
30) sc all around (30)
31) [1 x Invdec,
1 sc] all around, last st
Sl.st (20)
Leave a long yarn for attachment.
Ear:
(make 2):
Make with blue yarn
1) 6 sc into a magic ring
2) 6 x Inc (12)
3) 12 x Inc (24)
4) sc all around (24)
5) [1 x Inc, 1 sc] all around (36)
6) [1 x Inc, 2 sc] all around (48)
7-10) sc all around (48)
11) [1 x Invdec, 2 sc] all around, last st.
make a sl. st. (36)
Leave a long yarn.
For sewing the ear on the head please
look photos below: nr: 24-31
Hand:
(make 2)
Start with lilac yarn
1) 6 sc into a magic ring
2)
6 x Inc (12)
3)
[1 x Inc, 1 sc] all around (18)
4)
[1 x Inc, 2 sc] all around (24)
5)
sc all around (24)
6) bl all around (24)
7) color change for blue, sc all around (24)
8-11) sc all around (24)
11) 2 x [1 x Invdec,
10 sc] (22)
13-16) sc all around (22)
14) 2 x [9 sc, 1 x Invdec]
(20)
15) sc all around (20)
16) 2 x [1 x Invdec,
8 sc] (18)
17) sc all around (18)
18) 2 x [7 sc, 1 x Invdec]
(16)
19) sc all around (16)
20) [1 x Invdec, 2 sc] all around (12)
21) Invdec all around (6) Make a “neat finish”.
Fasten off, leave a length of yarn for attachment.
Leg: (make 2)
Start with lilac yarn
1) 6 sc into a magic ring
2)
6 x Inc (12)
3)
[1 x Inc, 1 sc] all around (18)
4)
[1 x Inc, 2 sc] all around (24)
5) [1 x Inc, 3 sc] all around (30)
6)
bl sc all around (30)
7) color change for blue, sc all around (30)
8- 10) sc all around (30)
11) 2 x [1 x Invdec, 13 sc] (28)
12-13) sc all around (28)
14) 2 x [12 sc, 1 x Invdec] (26)
15-18) sc all around (26)
19) 2 x [1 x Invdec, 11 sc] (24)
20-21) sc all around (24)
22) [1 x Invdec, 2 sc] all around (18)
23) sc all arou nd (18)
24) [1 Invdec + 4 sc] all around (15)
25) [1 x Invdec, 1 sc] all around (10)
26) [1 x Invdec,
1 sc] all around, last st.
sl.st (7)
Make a “neat finish”
Fasten off, leave a length of yarn for attachment
Joining: head to body (photos
15-16); legs and hands to body (photos 32-36); ears to head (photos 37-42); tail to body (43-49),
any accessories if you use
them.
Tail:
Directions can be found in the pictures below: 43-49!

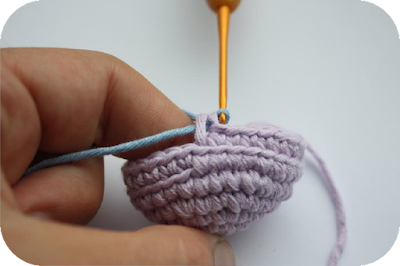
1. Here you can see how I use a long yarn left from the magic ring to mark rows. Here you can see also eye placement. Put eyes on 27th row. Count from the
beginning of the row 3 stitches, place 1 eye, then count again 20 stitches,
place another eye. On the photo you see the yarn as the beginning of the row and the first eye placed
(counted 3 stitches)

2. The Elephant´s head is done and the trunk will be formed next. The head and trunk is
made in one piece.

3. Working on the trunk. Here you can see the end of the trunk.

4. The final row of the trunk. I´m finishing off and starting to make a “neat finish“.

5. For the „neat finish“ I pick up from outside
in all the sc in the final row with a
tapestry needle…

6.
… one or two at the time and…

7.
(here all of the sc are „picked up“)

8. … pull on the tail to tighten
the stitches. This will give you a neat and proper
finish.

9. Weaving in the end of your yarn. Take the end of the yarn and thread it into the
middle of the head, to hide the yarn.

10. The trunk is almost done. Weave in the end of your yarn.

11. Elephant´s head is ready.

12. Another photo of the head (from the top)

13. Here you can see the body part.

14. Another photo from the top. Do not do a “neat finish” here.

15. Attaching
the head to the body. I use pins to
hold the pieces together. The end of the body part will remain just on the right side of the elephant, then you start joining. Look the body
shape. The larger curve should be on the backside of the elephant

16. I evenly stitch
two rows because
it fastens the head securely
in place and is
stronger for handling.

17. Making a leg. To bring another color into your elephant, you should start with the last st. of the previous
row to start the color
change.

18. Join the second
color…
19. …then you pull it trough…

20… and continue with sc all around with the new color.

21. You can crochet over the
yarn tail left over from color change to hide them instead of weaving them in afterwards. This shows how you can crochet over them immediately into your
crochet.

22. Making
the hand. Again,
I use yarn to mark the first sc in the row.

23. For stuffing you can use the other side of the crochet
hook. You´ll make two
hand and two legs. Follow
the pattern.

24. Here you can see the ears.

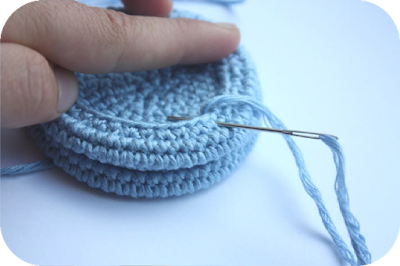
25. Now you are going to sew the last row to the ear to make it flat. On this side you
are going to attach a felt or some fabric.

26. Here the sewing part is done.
27. To make the other ear the same size, you can place one ear on top of
the other to have a size reference.

28. Here both ears are prepared
for the felt placement. Cut two felt circles, they should cover the sewing line of the
ear. For attachment you could use the button
stitch (blanket stitch).

29. Here you see the beginning of the button stitch.

30. Making button stitch.

31. And here the end of the button
stitches. Hide the yarn into ear. Do the same with the other ear.

32.I like to use pins to attach body parts temporarily just to see how my elephant is going to look like.
Take care not to prick
yourself! Here you can see that I place
hands and legs on a same line. Put the color change of the leg and hand on the back side of the elephant´s body. Then it will look prettier from the
front side of the elephant.
I attach the legs on the 10th row up from the beginning, just where the increasing part is done.

33. Here you see the closer photo.

34. Here I attach the arm from upperside of the hand…

35. Here you can see the lower attachment. Do the the same with both legs.

36. Here you see all the legs and hands attached. I still have ears left to be attached.

37. To attach ears on head :place pins. Choose the best place. Make an attachment
in three places, make little stitches to hold the ear to the head. Of course you can make couple of more stitches
if needed (then
the ears will be
closer to head, as you like).

38. Cut off a long piece
of yarn to attach the ears. You´ll hide it after both ears
are attached.

39. Here you see the attachment.

40. Here you see the attachment.

41. I use the same piece of yarn for the other ear as well, then I don´t have
to cut the yarn.
Hide both yarn ends.

42. Ears are nicely placed.

43. Making the tail: cut some yarns,
I cut 4 pieces of yarn. One piece of yarn is longer that the others.
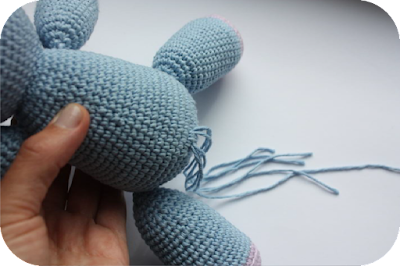
44. I pull them one by one through one stitch of the body where I want to make
the tail. The tail can be on the same line with legs.

45. Take one yarn (longer)and roll it over the others.

46. Then take the same yarn and use a yarn needle to go trough that tube.

47. ..until you reach to the body. Then hide the yarn tail.

48. Trim the yarn ends…

49. ..to form a little tail.
Well done, your elephant is ready!

Amigurumi: Mia the Elephant, additional pattern to Mio the Elephant
Head
Start with light-lilac color
1) 6 sc into a magic ring
2) 6 x Inc (12)
3) [1 x Inc, 1 sc] all around (18))
4) [1 x Inc, 2 sc] all around (24)
5) [1 x Inc, 3 sc] all around (30)
6) [1 x Inc, 4 sc] all around (36)
7) [1 x Inc, 5 sc] all around (42)
8) [1 x Inc, 6 sc] all around (48)
9) [1 x Inc, 7 sc] all around (54)
10) [1 x Inc, 8 sc] all around (60)
11) [1 x Inc, 9 sc] all around (66)
12-18) sc all around (66)
19) [1 x Invdec, 9sc] all around (60)
20) sc all around (60)
21) 30 sc, 3 x [1 x Invdec,
8 sc], (57)
22) sc all around (57)
23) 30 sc, 3 x [1 x Invdec,
7 sc](54)
24) sc all around (54)
25) 30 sc, 3 x [1 x Invdec,
6sc] (51)
26) 3 x [1 x Invdec,
8 sc], 21 sc(48)
Start stuffing here, continue: to stuff
gradually as you go!
27) 27 sc, 3 x [1 x Invdec,
5sc] (45),here will come safety eyes if they are used.
28) 27 sc, 3 x [1 x Invdec,
4sc] (42)
29) 3 x [1 x Invdec, 7sc], 3 x [1 x Invdec,
3sc] (36)
30) sc all around
(36)
If using safety eyes, place a stitch marker
On 30th row. You will place the eyes between row 30 and 31 on a row 27.
Eye placement: count from the
begining of the row approx. 3 stitches, place one eye, count
approx. 20 stitches place another eye. Look also the
head shape for better placement.
19)
3 x [1 x Invdec, 6sc],
3 x [1 x Invdec, 2sc] (30)
32-35) sc all around (30)
36)
2 x
[1 x Invdec, 5sc], 1 x Invdec, 14 sc(27)
37) sc all around (27)
38) 2 x [1 x Invdec, 4sc], 1 x Invdec, 13 sc (24)
39) sc all around (24)
40) 2 x [1 x Invdec, 3sc], 1 x Invdec, 12 sc (21)
41) sc all around (21)
42) 2 x [1 x Invdec, 2sc], 1 x Invdec, 11 sc (18)
43) sc all around (18)
44) 2 x [1 x Invdec, 1sc], 1 x Invdec, 10 sc (15)
45 -47) sc all around (15)
48) Invdec all around, sl. st. at the end Make a “neat finish”
Hand (make2)
Look photo below: 2 Start with lilac
color
1) 6 sc into a magic ring
2) 6 x Inc (12)
3) [1 x Inc, 1 sc] all around (18)
4) sc all around (18)
5) bl all around (18)
6) colour change for light – lilac color, sc all around (18)
7-11) sc all around (18)
12)
2 x [1 x Invdec, 7sc](16)
13-17) sc all around (16)
18) 2 x [6 sc, 1 x Invdec]
(14)
19) sc all around (14)
20) Invdec all around (7) Make a “neat finish”.
Fasten off, leave a length of yarn for attachment.
Leg (make 2)
Look photo below: 2
Start with lilac
color
1) 6 sc into a magic ring
2) 6 x Inc (12)
3)
[1 x Inc, 1 sc] all around (18)
4) [1 x Inc, 2 sc] all around (24)
5)
sc all around (24)
6)
bl sc all around (24)
7) color change for light – lilac color (24) 8- 11) sc all around
(24)
12) 2 x [1 x Invdec,
10 sc] (22)
13-16) sc all around (22)
17) 2 x [9 sc, 1 x Invdec] (20)
18-21) sc all around (20)
22) 2 x [1 x Invdec,
8 sc] (18)
23-24) sc all around (18)
25) 2 x [7 sc, 1 x Invdec] (16)
26) sc all around (16)
27) Invdec all around (8) Make a neat finish.
Fasten off, leave a length of yarn for attachment
Body
Start with green
yarn
1) 6 sc into a magic ring
2) 6 x Inc (12)
3) [1 x Inc, 1 sc] all around (18)
4) [1 x Inc, 2 sc] all around (24)
5) [1 x Inc, 3 sc] all around (30)
6) [1 x Inc, 4 sc] all around (36)
7) [1 x Inc, 5 sc] all around (42)
8) [1 x Inc, 6 sc] all around (48)
9) [1 x Inc, 7sc] all around (54)
10-11) sc all around (54)
12) bl sc all around (54) (here the skirt will be formed:
look photos below:
3-8)
13) color change for lilac – sc all around
(54)
14) 3 x [1 x Invdec,
16 sc] (51)
15) sc all around (51)
16) 7 sc, 2 x [1 x Invdec, 15 sc],1 x Invdec, 8 sc (48)
17-18)sc all around (48)
19) 3 x [1 x Invdec,
14 sc](45)
20) sc all around (45)
21) 6 sc, 2 x [1 x Invdec,
13 sc], 1 x Invdec, 7 sc (42)
22) sc all around (42)
23) 3 x [1 x Invdec,
12 sc] (39)
24) sc all around (39)
25) 5 sc, 2 x [1 x Invdec,
11 sc], 1 x Invdec, 6sc (36)
26) sc all around (36)
27) 3 x [1 x Invdec,
10 sc] (33)
28) sc all around (33)
29) 4 sc, 2 x [1 x Invdec,
9 sc],
1 x Invdec, 5
sc (30)
30) sc all around (30)
31) [1 x Invdec,
1 sc] all around, last st
Sl.st (20)
Leave a long yarn for attachment.
Tail :
You´ll find photos in Mio the elephant pattern! The same tail making is used here
as well.
Ear: (make 2):
1) 6 sc into a magic ring
2) 6 x Inc (12)
3) 12 x Inc (24)
4) sc all around (24)
5) [1 x Inc, 1 sc] all around (36)
6) [1 x Inc, 2 sc] all around (48)
7-9) sc all around (48)
10)
[1 x Invdec, 2 sc]
all around, last st. make a sl. st. (36) Fasten off.

1. Here you can see the body and the head of the elephant.

2. Here you can see all legs and hands.

3. Making
skirt. First row. You´ll make sc in every bl. sc.

4. You´ll take only one st. on the crochet hook.

5. Do not join rows, just continue crocheting.

6. Here you
see the first row when it´s done.

2nd row: 1 x Inc all around
3rd row: [1 x Inc + sc]
4th – 7th row: sc all around, make sl. st. at the end of the skirt. You may add rows if you want the skirt to be long
8. Hide the yarn. Lovely skirt is ready. You may add pearls if you want.

And you´ll have two lovely elephants